How to Enable Spell Checking in Word?
When you're working with Word and typing text, there are situations where mistakes are likely to occur. To ensure that there are no shortcomings in the future, a spelling and grammar checking system was created. The software automatically monitors the correct spelling of the content. If something is wrong, sometimes there is an automatic replacement for the correct version. But all this is only if the corresponding options are activated. This guide is about how to enable spell checking in Word. www.office.com/myaccount
If you see that the system does not respond to errors in any way, deal with this issue. This will improve the quality of your work. A person, even if he is as literate as possible, can make mistakes or typos. With the help of the program, the vast majority of defects are detected in just a couple of seconds.
Enable spell checking:
The first point is the direct answer to the question of how to enable spell checking in Word. It is not difficult to do this; you just need to follow the elementary instructions:
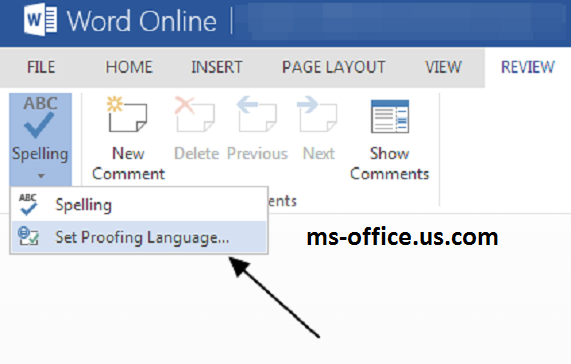
- Run the program, then go to the "File" tab. It is located in the upper left corner of the window.
- A small pop-up window will appear. To continue the instructions, go to the "Spelling" tab. It is located in the vertical menu on the left side.
- You can see how the settings items on the right are updated. Now you can edit everything related directly to spelling.
- First of all, you need to check all the checkboxes in the "When correcting spelling in Word" block. Needed to get the best response.
- In the lower section "File exclusions", uncheck the boxes if they are present.
- It remains only to click on "OK". This is necessary in order to apply all the changes made and close the settings window.
Now you know how to enable spell checking in Word. It is fair to say that the activated options apply to all documents. Including speech about those that will be created in the future.
About the principle of the system
So, you have everything set up and now write some text. The principle is that in addition to words and various phrases that are printed with an error, the system also underlines those words that it perceives as unknown. They are so for a simple reason. To be more precise, the words are not added to a special built-in dictionary that is installed with the software.
In addition, words in a language other than the main language pack may be underlined. If you are working with a spell checker and an English word appears, the system may not recognize it.
The word that is underlined can be added to the base. As a result, the line under it will disappear. To do this, you just need to click on the word RMB, select "Add to dictionary".
Alternatively, you can click "Ignore All", which will exclude the check for this word. As a result, the underlining will also disappear.
In general, when error checking is activated, it's time to start looking for and fixing them. The next section will provide more details on this.
Performing a spell check
You already know how to enable spell checking in Word. Now is the time to start looking for errors and fix them. Your task in this case is reduced only to the search for those fragments that the system has underlined.
By right-clicking on the area marked with the error, you can watch the context menu appear. At the very top, information about word replacement options will be presented. In addition, sometimes the system writes about what problems there are in relation to punctuation.
Fix everything you have. It is better to do this immediately when you are just typing. So you definitely won't miss anything. The most important recommendation is to generally proofread the text after writing it. Then the probability of the presence of errors is minimized. office.com/setup
Conclusion
Now you know how to enable spell checking in Word. This process is as simple as possible, since you only need to perform a few manipulations in the settings. The result is a situation where any shortcomings are quickly detected by the system. As a result, you can fix them, preventing the occurrence of errors.


